皆さん、こんにちは。ゴールデンウィーク後半はRoboCupジャパンオープン三昧予定のyukiです。
先週、アクセスが少ないとつぶやいたら、ブログ読んでますってわざわざ店頭引取りで品物を買いに来てお店に言いに来てくださった方もいました。とても元気でました!ご愛読ありがとうございます!(私はあちこち行ったりして毎日会社にいるわけではないのでふらっとお店に来ても会えるとは限らないですよ。w)
Hi All, I’m yuki.
I plan to join
RoboCup Japan Open for national holidays in May.
Last week, I wrote here less access. Customer came to shop to get his order to say me “I’m fun of your article in blog.” I’m very happy to hear that. :-) Thank you for all of you to read our blog. (However, I’m sometime to visit outside. You don’ t hope to meet me at shop.)
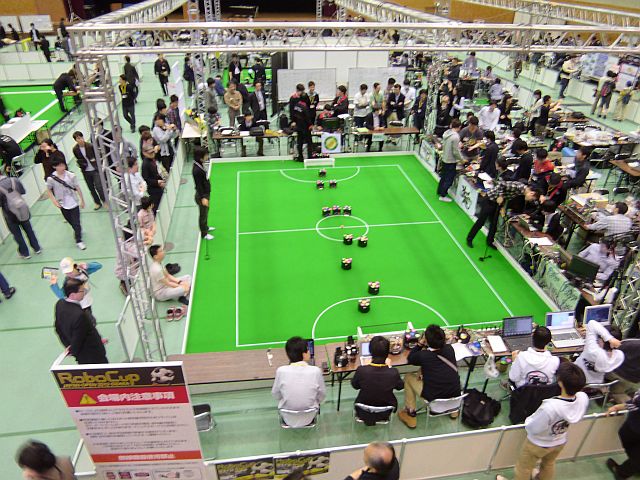
RoboCupは1997年に日本人研究者が始めた自律型ロボット競技会で今では世界35カ国がチャレンジする大きな組織になっています。私は1998年から小型リーグと言う直径18cmほどの小さな車輪型ロボットのサッカーリーグに携わっておりまして、最初は選手として出ておりましたが、最近は裏方に回っているので今年もお手伝いに行きます!
RoboCupは、2050年に人間のサッカーチャンピオンチームと互角に戦えるロボットチームを目指すグランドチャレンジと言われる研究目標でもあります。私は初回の大会からずっと見て来てますので、2050年の試合はかぶりつきで見ることをライフワークにしていたりします。w
今年は玉川学園(東京・町田市)で開催ですので、お近くの方はぜひ見に来てください!ちなみに、たくさん面白い試合を見たい人にはロボットの調整がトップギアにのってる5月5日がお勧め、全部の決勝戦を見て回りたい人には少しずつ決勝戦の時間がずらされていますので5月6日がお勧めです。
せっかくなので、今日のメインディッシュの前に去年のSSL決勝戦をご覧ください。w
ところで、最近覚えたCMの流行語を使ってみたいイタイお年頃なので、ちょっと言ってみたい。
ロボットいつ始めるの?今でしょ。w
アールティロボットショップもお店なので、来年4月の消費税増税のニュースはとても気になります。消費税増税となるとロボットの部品はまだまだお高いですから3%アップと言えども馬鹿になりませんよね。それに、海外の輸入品はもちろん、国内のロボットメーカーも大半は材料を輸入しています。アベノミクスでこのまま円安傾向が続くことになるともろに影響が出てきますので、品物の値上げもあるんじゃないかなーと今からショップはビクビクです。
実際、弊社が輸入しているTurtlebot2や、提携しているスイッチサイエンスさんの品物は輸入品がメインですので、4月から値上げされています。今は落ち着いていますが、円安傾向は続く見通しとのことなので、買うならほんと今です。
トレンドとしても、大学のロボット学科の開設もここ1-2年で増える見通しで、企業も次々とロボット事業部とか準備室とか構えてきている昨今、景気が動き出してきた感じがします。学生も企業もロボット始めるなら、部品買うなら今年度だと思います。個人はもちろん、公費にも対応していますのでぜひこの連休中にでもアールティロボットショップでのお買い物を計画してくださいね!w
閑話休題。メインディッシュ行きましょう。w
さて今週は、デバイスマネージャーをいちいち見に行かなくてもシリアルポートを読み込む設定について解説します。
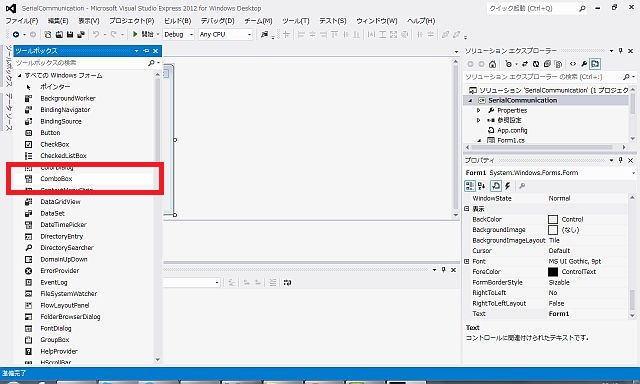
今回使うのは、comboboxです。comboboxを開いたら、現在使用可能なPCに接続されているシリアルポートを読み込んでくれる便利な設定をしてみましょう。
まずは、これまで作ってきたプログラムの中ほど(前々回記事の84行目)にある部分を変更します。
下記と同じ記述のところを探し出して、ハイライトの部分をコメントアウトしてください。
今回は、この部分をcomboBoxとボタンで実現しますので、初期化の時には読みに行かない設定にします。
        private void Form1_Load(object sender, EventArgs e)
        {
//            if (serialPort1.IsOpen == false)
//            {
//                serialPort1.Open();
//            }
        }
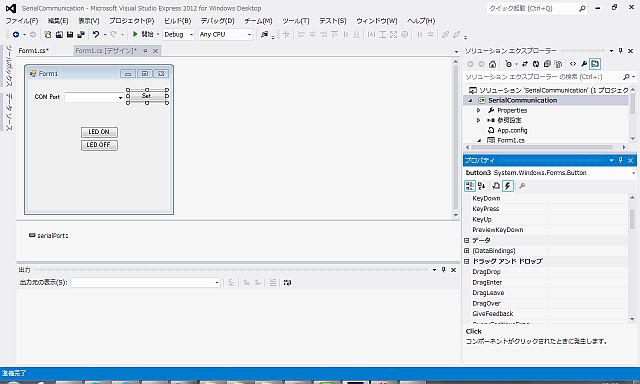
次にデザインタブでデザインに戻ります。
comboBoxをForm1にドラッグアンドドロップします。
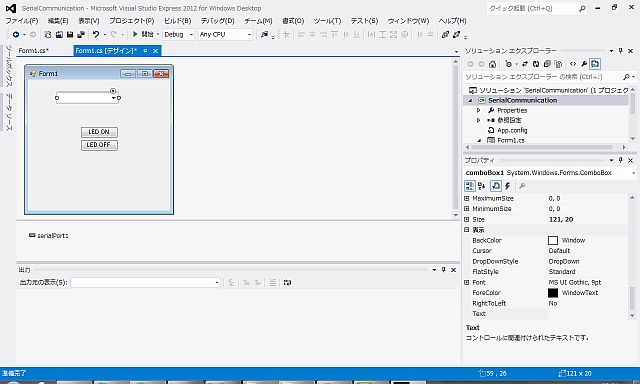
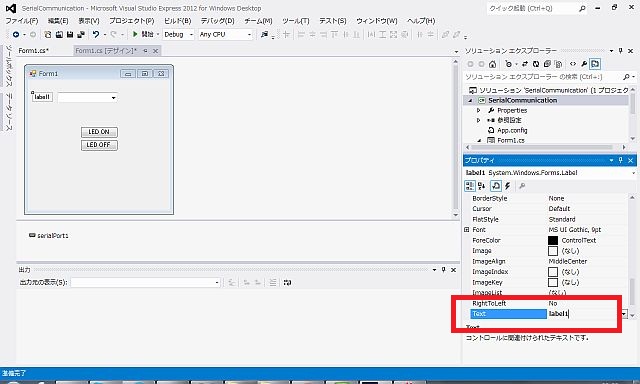
comboBox1が設置されます。これだと味気ないので、Labelを追加して何の欄かわかるようにします。
次にLabelをForm1にドラッグアンドドロップします。
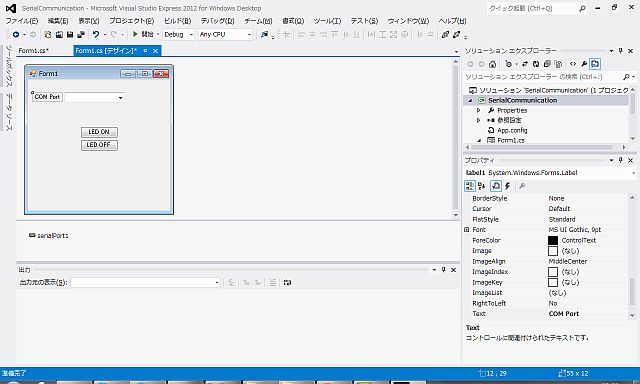
Label1のテキストを”COM Port”に変更します。
下図のように変わりましたね?
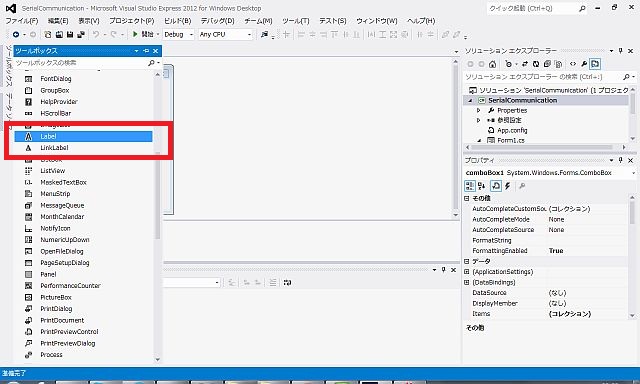
次にButtonをForm1にドラッグアンドドロップします。
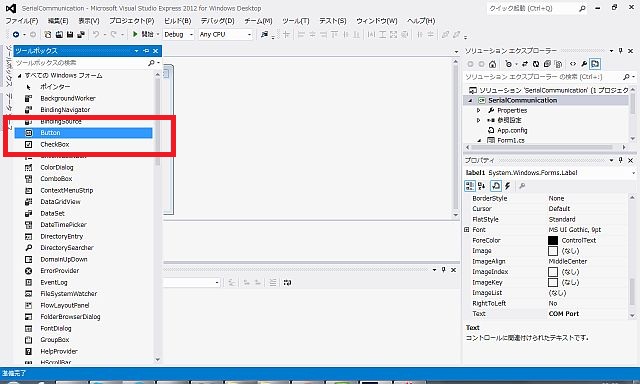
Button3のテキストを”Set”に変更します。
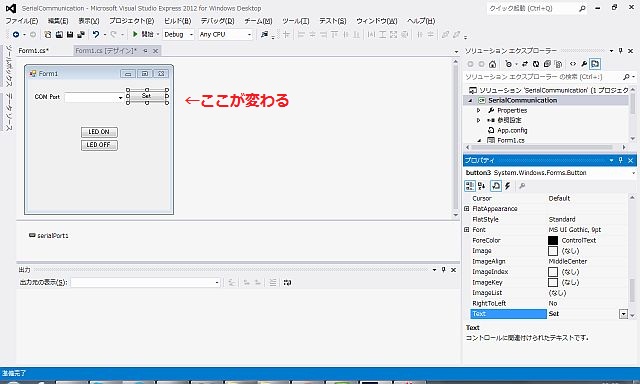
ここまででデザインはできました。
次に、comboBox1とbutton3のイベントをプログラムします。
まず、comboBox1のプロパティで赤枠の雷マークをクリックしてください。
このリストの中から、”DropDown”というイベントを探してダブルクリックします。
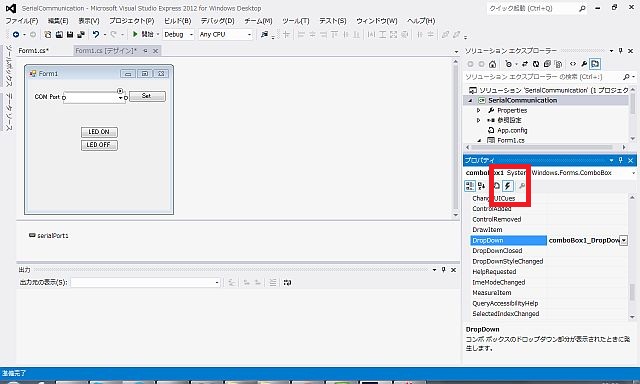
そうすると、プログラム画面が開きます。
private void comboBox1_DropDown( object sender, EventArgs e)のイベントが準備されていますので、ここに下記のように追加してください。
解説は、ソースコードにつけましたので参照してください。
         private void comboBox1_DropDown( object sender, EventArgs e)
        {
            // すべてのシリアル・ポート名を取得する
            string [] ports = SerialPort .GetPortNames();

            // シリアルポートを毎回取得して表示するために表示の度にリストをクリアする
            comboBox1.Items.Clear();

            foreach (string port in ports)
            {
                // 取得したシリアル・ポート名を出力する
                comboBox1.Items.Add(port);
            }
        }
これで、comboBoxからPCにつなげられたシリアルポートが見えます。
次に、comboBox1が設定された後に設定をするbutton3の動作をプログラムします。
タブで”デザイン”に戻ってください。
ここでもbutton3(“set”ボタン)をダブルクリックします。このダブルクリックは、イベントの”Click”を設定したのと同じ意味になります。
開いたプログラム画面で次のようにプログラムを追加します。こちらも同じく解説はソースコードの中です。
        private void button3_Click( object sender, EventArgs e)
        {
            //もしcomboBox1に設定があればシリアルポートを開く
            if (comboBox1.Text != "" )
            {
                serialPort1.PortName = comboBox1.Text; //comboBox1.Textをシリアルポートのポート名として設定

                serialPort1.BaudRate = 57600; //ボーレートを設定(固定)

        //もしシリアルポートが使われていたら一旦閉じる(閉じられていたらスルーします。)
                if (serialPort1.IsOpen == true )
                {
                    serialPort1.Close();
                }
        //シリアルポートが使われていないのを確認してシリアルポートを開きます。
                if (serialPort1.IsOpen == false )
                {
                    serialPort1.Open();

                    if (serialPort1.IsOpen == true ) //シリアルポートが開けたか開けないかをメッセージウインドウでお知らせ
                    {
                        MessageBox .Show("Open Success\n" + serialPort1.PortName.ToString() + " " + serialPort1.BaudRate.ToString());
                    }
                    else
                    {
                        MessageBox .Show("COM Port error" );
                    }
                }
            }
        }
これで選択したCOMポートの値を設定して、ボーレート57600でシリアルポートを開けます。
勘のよい方はお気づきですね?
ボーレートも同じようにしてcomboBoxを使えばリストにして追加できますので自分で工夫してみてください。(ボーレートを文字列でcomboBoxに入れて読み込む場合は、文字列から数値に変換するところだけ気をつけてください。)
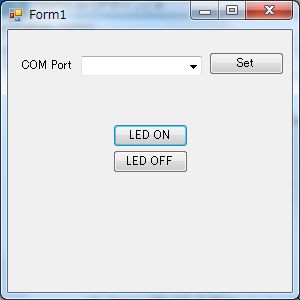
コンパイルしたらこんな画面になって設定できてるはずです。
簡単ですか?そうでもない?
念のため、今日作ったプログラム全文を載せますので、確認してみてください。
using System;
using System.Collections.Generic;
using System.ComponentModel;
using System.Data;
using System.Drawing;
using System.Linq;
using System.Text;
using System.Threading.Tasks;
using System.Windows.Forms;
using System.IO.Ports;
using System.ServiceProcess;


namespace SerialCommunication
{
    public partial class Form1 : Form
    {
        public Form1()
        {
            InitializeComponent();
        }

        //ROBOTIS用のチェックサムの計算
        private byte calc_checksum_robotis( byte[] packet)
        {
            int checksum = 0;

            for (int i = 2; i < packet.Length - 1; i++)
            {
                checksum += ( int )packet[i];
            }

            checksum = (~checksum) & 0xFF;

            return (byte )(checksum&0xFF);
        }

        private void button1_Click( object sender, EventArgs e)
        {
            byte [] param = new byte[8];
            int size = 0;
            int id = 4;

            //パラメータのセット
            param[size++] = 0xFF;                   //ヘッダー
            param[size++] = 0xFF;                   //ヘッダー
            param[size++] = ( byte )(int )(id & 0xFF); //ID
            param[size++] = ( byte )4;                //パラメータのバイト数+2
            param[size++] = ( byte )3;                //2: READ, 3: WRITE
            param[size++] = 0x19;                   //LED map address
            param[size++] = 1;                      // 1: on 0: off
            param[size++] = calc_checksum_robotis(param);

            //サーボの書き込み
            if (serialPort1.IsOpen == true )
            {
                serialPort1.Write(param, 0, size);
            }
        }

        private void button2_Click( object sender, EventArgs e)
        {
            byte [] param = new byte[8];
            int size = 0;
            int id = 4;

            //パラメータのセット
            param[size++] = 0xFF;                   //ヘッダー
            param[size++] = 0xFF;                   //ヘッダー
            param[size++] = ( byte )(int )(id & 0xFF); //ID
            param[size++] = ( byte )4;                //パラメータのバイト数+2
            param[size++] = ( byte )3;                //2: READ, 3: WRITE
            param[size++] = 0x19;                   //LED map address
            param[size++] = 0;                      // 1: on 0: off
            param[size++] = calc_checksum_robotis(param);

            //サーボの書き込み
            if (serialPort1.IsOpen == true )
            {
                serialPort1.Write(param, 0, size);
            }
        }

        private void Form1_Load( object sender, EventArgs e)
        {
//            if (serialPort1.IsOpen == false)
//            {
//               serialPort1.Open();
//            }
        }

        private void Form1_FormClosed( object sender, FormClosedEventArgs e)
        {
            if (serialPort1.IsOpen == true )
            {
                serialPort1.Close();
            }
        }

        private void comboBox1_DropDown( object sender, EventArgs e)
        {
            // すべてのシリアル・ポート名を取得する
            string [] ports = SerialPort .GetPortNames();

            // シリアルポートを毎回取得して表示するために表示の度にリストをクリアする
            comboBox1.Items.Clear();

            foreach (string port in ports)
            {
                // 取得したシリアル・ポート名を出力する
                comboBox1.Items.Add(port);
            }
        }

        private void button3_Click( object sender, EventArgs e)
        {
            //もしcomboBox1に設定があればシリアルポートを開く
            if (comboBox1.Text != "" )
            {
                serialPort1.PortName = comboBox1.Text;

                serialPort1.BaudRate = 57600;

                if (serialPort1.IsOpen == true )
                {
                    serialPort1.Close();
                }

                if (serialPort1.IsOpen == false )
                {
                    serialPort1.Open();

                    if (serialPort1.IsOpen == true )
                    {
                        MessageBox .Show("Open Success\n" + serialPort1.PortName.ToString() + " " + serialPort1.BaudRate.ToString());
                    }
                    else
                    {
                        MessageBox .Show("COM Port error" );
                    }
                }
            }
        }

    }
}
こんな設定ばっかりは飽きる!ロボットは動かしてなんぼでしょ、サーボはいつ動くのよ?って思ってる方もいっぱいいると思います。
そんなわけで、来週はスライダーの使い方について解説。
いよいよサーボを動かします。w
そうそう。
アールティ人型ロボット研究所も2013年5月1日に開設致しました。こちらはブログサイトのみですが、社内で開発している人型ロボットRICシリーズを中心に、関連技術について情報発信していくサイトです。まだ何も無いサイトですが、コンテンツも徐々に充実させていきます。
ぜひお気に入りにご登録いただき、ご活用ください。
【関連商品】
 MX-64Rスターターセット購入ページへ |
 Dynamixelショップページ |
 ROBOTIS関連商品ページ |
RoboCup is the grand challenge for robotics researcher what has started from Japan and Japanese researchers in 1997. Right now 35 countries join to the world competition. Japan Open is local competiton in Japan. I joineed to RoboCup Small size league from1997. I was one of team to participate SSL which has 5 small 18cm diameter wheel robots.
RoboCup aims to make match with human champion team of soccer by robots. I watched first game in 1997, I hope to watch the game in 2050! It’s my life work.
In this year, we have RoboCup Japan open in Tamagawa Univ.(Tokyo, Machida city). Please come and enjoy RoboCup at the site. I recommend you to come 5th May if you want to watch many great games, 6th May to watch finals.
Let’s see SSL finals in last year in youtube!
BTW, I wanna to say rumor CM in Japanese.
When do you start robot? Right Now!
We are robot shop, we are worry about tax increasing in coming Apr. 2014. Total 8%, up to 3% from now, is heavy for robot parts because they are expensive. Add to say, Japanese robot manufacturers import parts and materials from other countries. Money exchange rate JPY is down and down. It makes parts price to became up.
In fact, we import Turtlebot2 and SwitchScience items to be price up in last Apr. I recommend you to buy parts and robot right now before price up.
We see dawn purple of robotics boom by opening of the department of robotics in Univ. and robot departiment of companies. I think economy would be better. Please make plan to buy parts and robot in our shop during national holidays.
Let’s go to main section.
In this week, we make program to find serial port if we don’t watch device manager.
We use comboBox. Let’s set comboBox to show serial port on PC.
First of all, please change in the previous article (84line).
Please find following program and comment out in highlight.
We realize this function with comboBox and button. Therefore, we disable to this function in initialize area.
        private void Form1_Load(object sender, EventArgs e)
        {
//            if (serialPort1.IsOpen == false)
//            {
//                serialPort1.Open();
//            }
        }
Back to design tab in workspace.
Drag and drop “comboBox” to “Form1”.
Let’s see comboBox1. But we should put Label to see what comboBox is.
Next, drag and drop “Label” into “Form1.”
Replace text of Label1 to “COM Port.”
Have you confirmed as below?
Next, drag and drop button into Form1.
Replace text of Button3 to “Set.”
We succeeded in design. :-)
Next, we start to make function of comboBox1 and button3.
Please click on comboBox in design tab and see property “event button” in red frame
Let’s find “DropDown”event from the list, then double click in the event list.
We can move to program window.
There is “private void comboBox1_DropDown( object sender, EventArgs e)” empty event.
Please add source code as below and refer to source code for description.
         private void comboBox1_DropDown( object sender, EventArgs e)
        {
            // Get all serial ports name
	    string [] ports = SerialPort .GetPortNames();

            // Clear comboBox list to get latest serial ports in each dropdown.
            comboBox1.Items.Clear();

            foreach (string port in ports)
            {
                // Output serial port to dropdown list.
                comboBox1.Items.Add(port);
            }
        }
You can see all serial ports connected to PC in dropdown list of comboBox1.
Next, we make function for button3 to open serial port.
Let’s get back to design tab to prepare event source code.
Double click on button3(“set” button). This double click means same to set “Click” event.
Then add program as below. As the same, description is in source code.
        private void button3_Click( object sender, EventArgs e)
        {
            // if comboBox1 has text to open serial port. if there is nothing, function throughs.
            if (comboBox1.Text != "" )
            {
                serialPort1.PortName = comboBox1.Text; //comboBox1.Text set to PortName

                serialPort1.BaudRate = 57600; //Baudrate is set (fix.)

        //if serial port has opened, it must be closed at first.
                if (serialPort1.IsOpen == true )
                {
                    serialPort1.Close();
                }
        //open the serial port after confirmation serial port closed.
                if (serialPort1.IsOpen == false )
                {
                    serialPort1.Open();

                    if (serialPort1.IsOpen == true ) //message window shows serial port status.
                    {
                        MessageBox .Show("Open Success\n" + serialPort1.PortName.ToString() + " " + serialPort1.BaudRate.ToString());
                    }
                    else
                    {
                        MessageBox .Show("COM Port error" );
                    }
                }
            }
        }
Yes, we did.
Our program can set COM port from comboBox1 list with baudrate 57600.
As you know, you can set baudrate as the same way. Do it yourself. :-)
#please remark to change text to numeric when you use comboBox list text to put baudrate.
You can see below window if you push F5 to compile.
Is it easy for you or not?
I show you all source code below to confirm yourself.
using System;
using System.Collections.Generic;
using System.ComponentModel;
using System.Data;
using System.Drawing;
using System.Linq;
using System.Text;
using System.Threading.Tasks;
using System.Windows.Forms;
using System.IO.Ports;
using System.ServiceProcess;


namespace SerialCommunication
{
    public partial class Form1 : Form
    {
        public Form1()
        {
            InitializeComponent();
        }

        //ROBOTIS用のチェックサムの計算
        private byte calc_checksum_robotis( byte[] packet)
        {
            int checksum = 0;

            for (int i = 2; i < packet.Length - 1; i++)
            {
                checksum += ( int )packet[i];
            }

            checksum = (~checksum) & 0xFF;

            return (byte )(checksum&0xFF);
        }

        private void button1_Click( object sender, EventArgs e)
        {
            byte [] param = new byte[8];
            int size = 0;
            int id = 4;

            //パラメータのセット
            param[size++] = 0xFF;                   //ヘッダー
            param[size++] = 0xFF;                   //ヘッダー
            param[size++] = ( byte )(int )(id & 0xFF); //ID
            param[size++] = ( byte )4;                //パラメータのバイト数+2
            param[size++] = ( byte )3;                //2: READ, 3: WRITE
            param[size++] = 0x19;                   //LED map address
            param[size++] = 1;                      // 1: on 0: off
            param[size++] = calc_checksum_robotis(param);

            //サーボの書き込み
            if (serialPort1.IsOpen == true )
            {
                serialPort1.Write(param, 0, size);
            }
        }

        private void button2_Click( object sender, EventArgs e)
        {
            byte [] param = new byte[8];
            int size = 0;
            int id = 4;

            //パラメータのセット
            param[size++] = 0xFF;                   //ヘッダー
            param[size++] = 0xFF;                   //ヘッダー
            param[size++] = ( byte )(int )(id & 0xFF); //ID
            param[size++] = ( byte )4;                //パラメータのバイト数+2
            param[size++] = ( byte )3;                //2: READ, 3: WRITE
            param[size++] = 0x19;                   //LED map address
            param[size++] = 0;                      // 1: on 0: off
            param[size++] = calc_checksum_robotis(param);

            //サーボの書き込み
            if (serialPort1.IsOpen == true )
            {
                serialPort1.Write(param, 0, size);
            }
        }

        private void Form1_Load( object sender, EventArgs e)
        {
//            if (serialPort1.IsOpen == false)
//            {
//               serialPort1.Open();
//            }
        }

        private void Form1_FormClosed( object sender, FormClosedEventArgs e)
        {
            if (serialPort1.IsOpen == true )
            {
                serialPort1.Close();
            }
        }

        private void comboBox1_DropDown( object sender, EventArgs e)
        {
            // すべてのシリアル・ポート名を取得する
            string [] ports = SerialPort .GetPortNames();

            // シリアルポートを毎回取得して表示するために表示の度にリストをクリアする
            comboBox1.Items.Clear();

            foreach (string port in ports)
            {
                // 取得したシリアル・ポート名を出力する
                comboBox1.Items.Add(port);
            }
        }

        private void button3_Click( object sender, EventArgs e)
        {
            //もしcomboBox1に設定があればシリアルポートを開く
            if (comboBox1.Text != "" )
            {
                serialPort1.PortName = comboBox1.Text;

                serialPort1.BaudRate = 57600;

                if (serialPort1.IsOpen == true )
                {
                    serialPort1.Close();
                }

                if (serialPort1.IsOpen == false )
                {
                    serialPort1.Open();

                    if (serialPort1.IsOpen == true )
                    {
                        MessageBox .Show("Open Success\n" + serialPort1.PortName.ToString() + " " + serialPort1.BaudRate.ToString());
                    }
                    else
                    {
                        MessageBox .Show("COM Port error" );
                    }
                }
            }
        }

    }
}
Weldone!
It’s so easy. Robot does matter to drive motor!, you think. :-)
I know! We’ll drive servo motor with slider in next week.
Can’t wait?
Well, I wanna show you that we open RT Humanoid Robot Institutes as blog site to deliver our information of humanoid development. We show RIC series and concerning news of humanoid robots in this site. We plan to add many contents to here.
Please bookmark and enjoy!
Thank you for your attention. :-)
See you next week!