先週末は、ネコ店長にくっついて、巌流島に行ってきました。
嵐の前だったのと島なので、ものすごい風でネコ店長も大変でした。
ロボットは風が強いとなかなか体制を維持するのが大変ですね。
ネコ店長では、着ぐるみを着せるために安全性の観点から燃えにくい仕組みのサーボモータとしてRS405CBを使っています。(温度管理がされているため2009年から今まで燃えた事例は見たことがないので社内での信頼は厚いです。)RS405CBは、RS485のシリアル通信(双葉電子工業製)を使っています。
とはいえ、今回のネコ店長は、専用CPUで動かしていたので、今回のPCでの通信とは又違った感じになります。
I visited Ganryu jima with Nekotencho in last weekend.
There was strong wind because of storm coming and island.
It was hard to keep balance for robot in strong wind.
We used RS405CB (Futaba) for Nekotencho from view point of safety (not to burn) to put costume.
RS405CB is good control of temperature and burning. We used RS405CB from 2009 for Nekotencho, it never burned. RS-405CB uses RS485 serial communication. However, Nekotencho uses micro computer to control for outside activities. It is different from PC communication.
Change subject, have you installed Visual Studio 2012 Express in your PC?
さて、皆さん、先週お願いしたVisualStudio2012はインストールできましたでしょうか?
私のモットーは、まず作って動かせ。
きれいで動かないコードより、汚くてもばっちり動くコード。
ということで、もういきなりさくさく作っていきましょう。
まずは、準備として、MX-64Rのシリアルポートの接続を調べましょう。
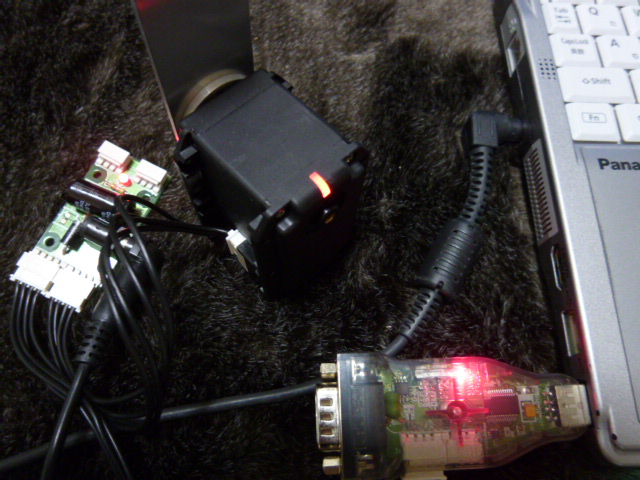
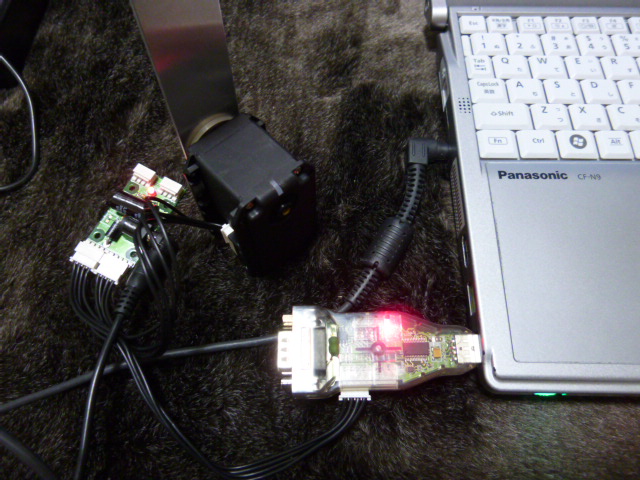
PCに先週紹介したキットを接続してください。
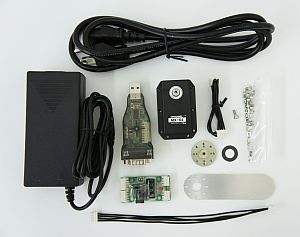
写真をクリックでMX-64Rスターターキット購入ページへ
YukiのPCはWin7なので、Win7での事例を紹介。
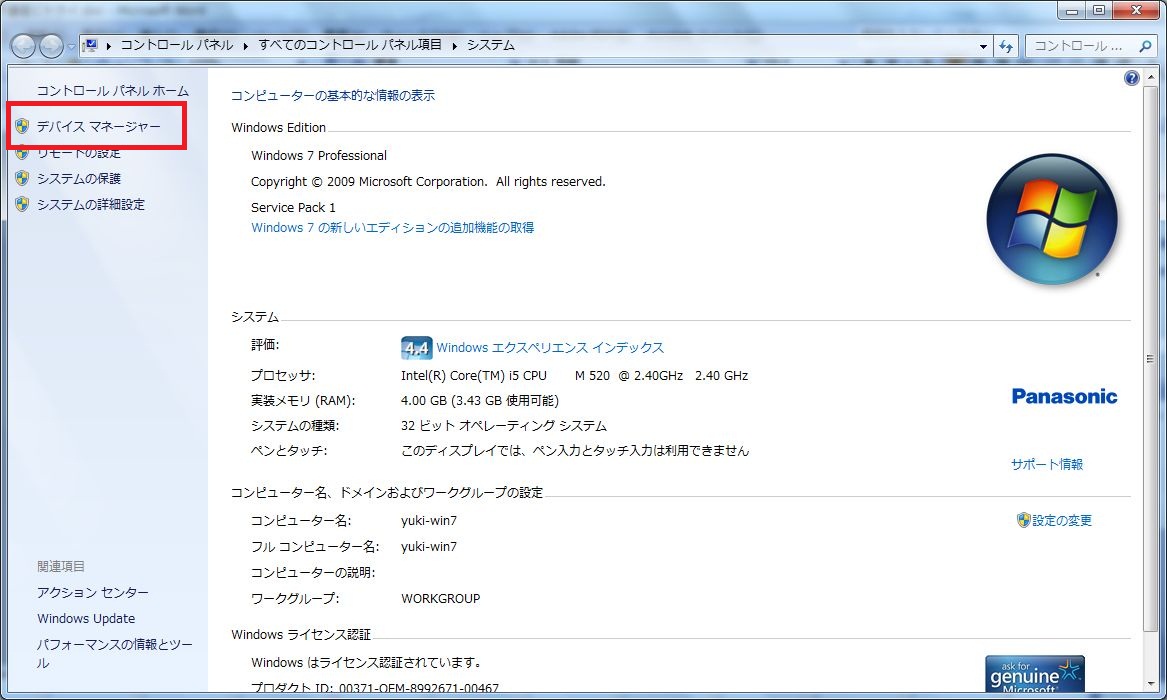
コントロールパネルの右上に出てくる「デバイスマネージャー」を選択
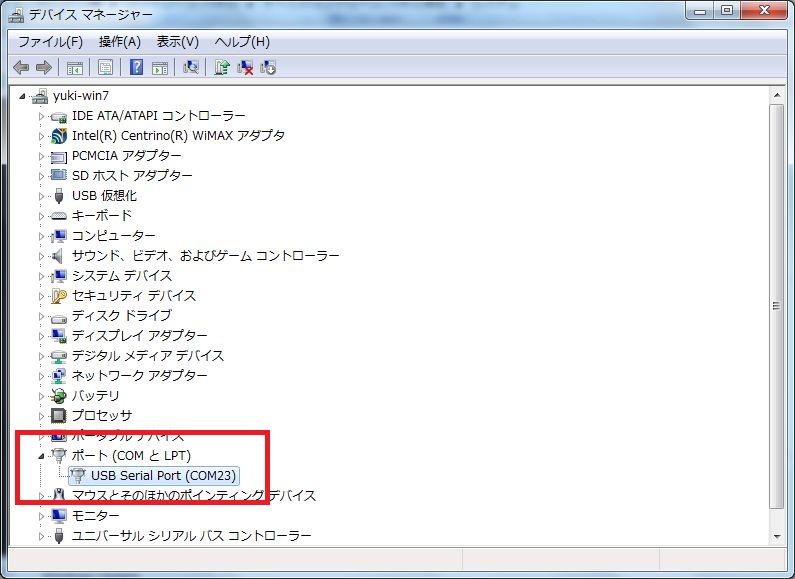
「ポート(COMとLPT)」の前の三角矢印をクリックして、赤枠のようにポートを出します。このCOM23と書いてあるところが、皆さんのPCごとに異なる番号がついていると思いますので、後で使いますから、メモっておいてください。
さて、では、いよいよ、C#でプログラムを組んでいきます。
C#わかんないよ、と言う人は入門書を読んでいただくとして、このブログで今回覚えてほしいのは、次の2つです。
(入門書は最後に紹介)
* シリアルポートの設定
* Byteの扱い方
この2つが押さえられていれば、実はあとはもうとても簡単!(ではないという声が社内から飛んできたがw) 今回は、通信できていることを確認するために、MX-64RのLEDをオンオフするプログラムを作ります。
ROBOTISからはDynamixel用のライブラリが配布されているのですが、ライブラリを使ってしまうと、ライブラリ依存でパケットの作りや、通信の基礎がわからなくなってしまいます。
そこで、今回の連載では汎用的なシリアルポートの使い方を学習するためにライブラリを使わずに進めます。
まずは、VisualStudio2012 C#を起動してください。
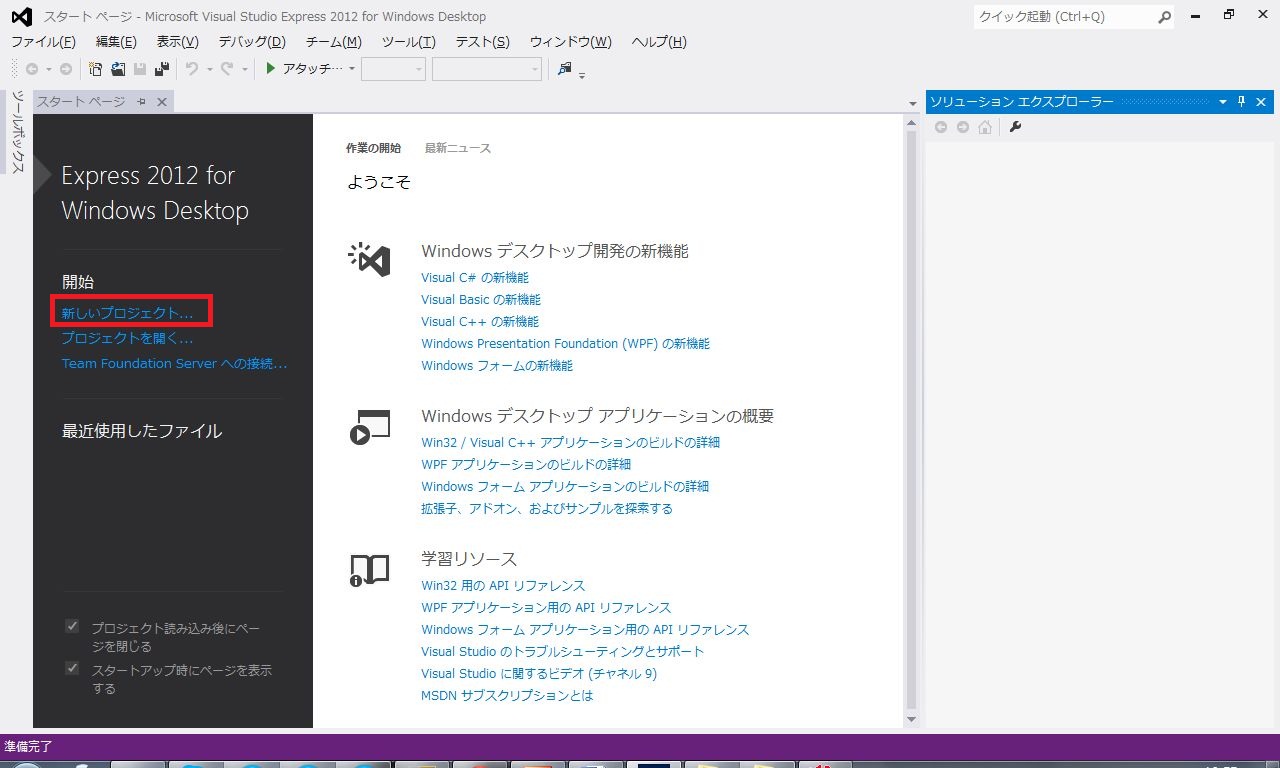
VisualStudio2012を起動すると出てくる画面で、赤枠内の「新しいプロジェクト」を選択します。
次に出てきたWindowで、
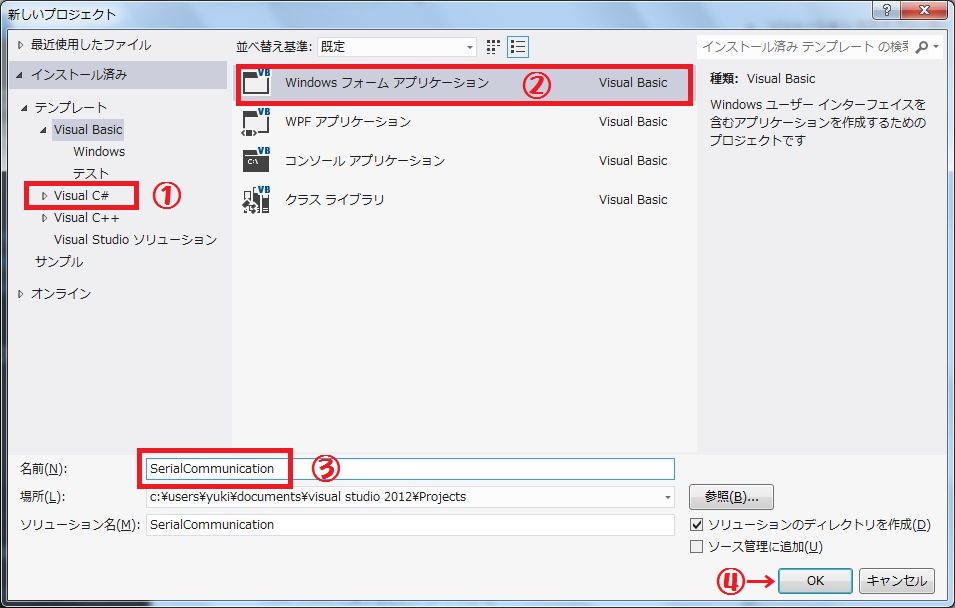
1) VisualC#を選択 (何もしないとVisual Basicになるので要注意)
2) Windowsフォームアプリケーションを選択
3) プログラム名「SerialCommunication」を入力(自分の好きな名前でもOK)
4) 「OK」ボタンをクリック
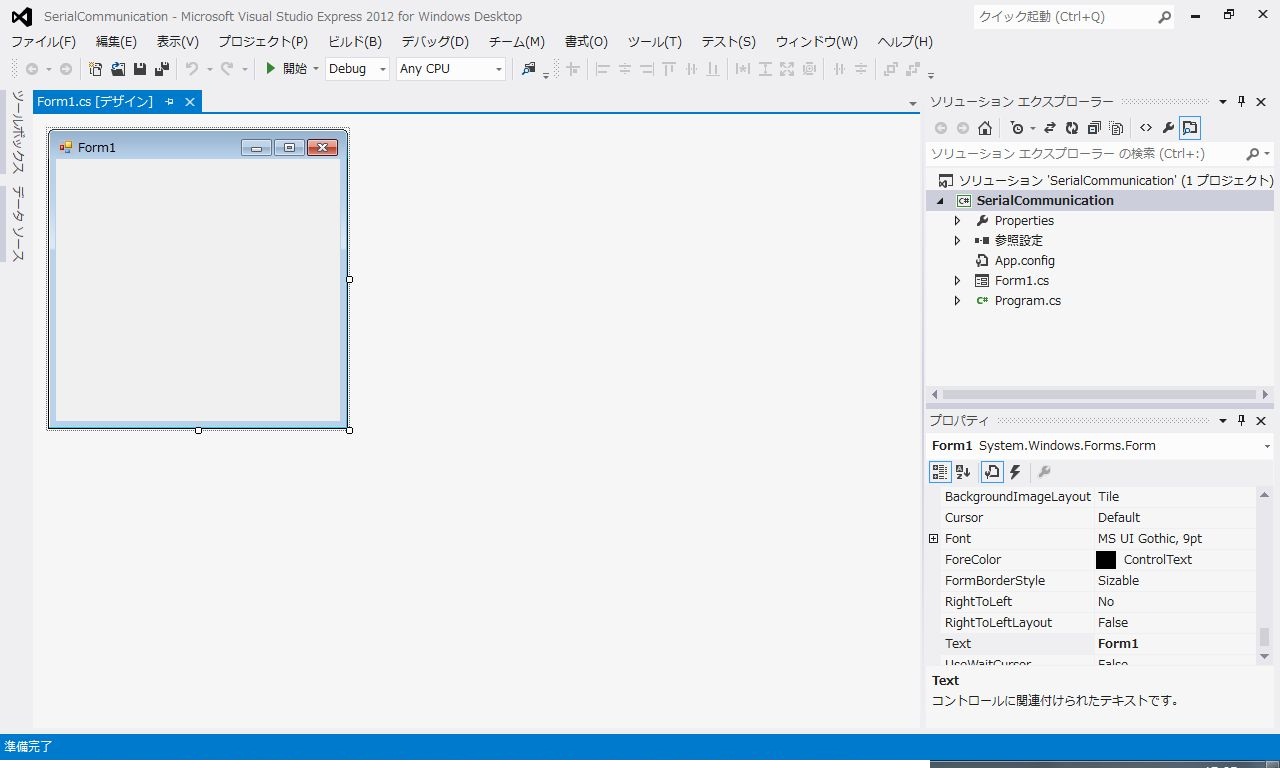
プログラムの開発環境が出てきます。ここで出てきた画面がForm1です。
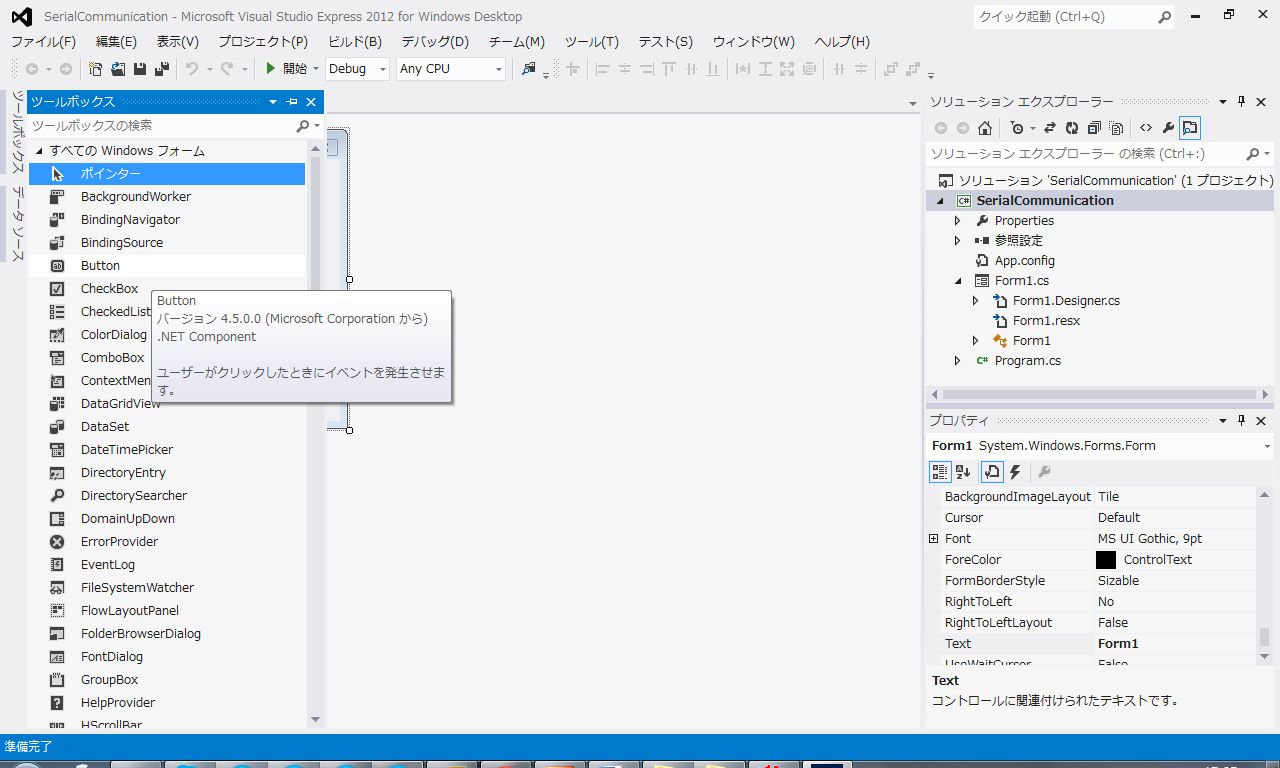
ここで、左側のツールボックスからボタンを2つドラッグアンドドロップしてきます。
ボタンの名前を変更します。

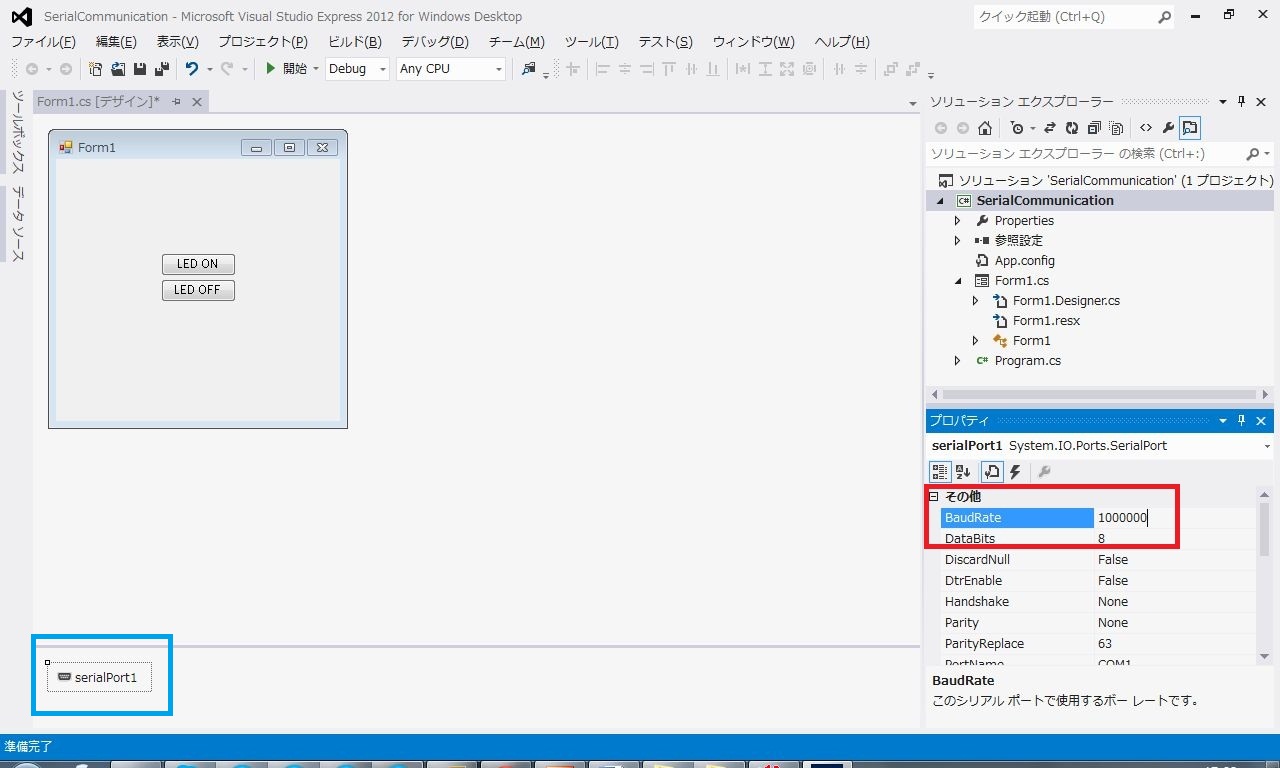
赤枠にあるButton1のTextを「LED ON」に変更

赤枠のButton2のTextを「LED OFF」にします。
次に、シリアルポートを設定します。
赤枠のようにツールボックス(大分下のほうにあります。)から、シリアルポートをForm1にドラッグアンドドロップします。
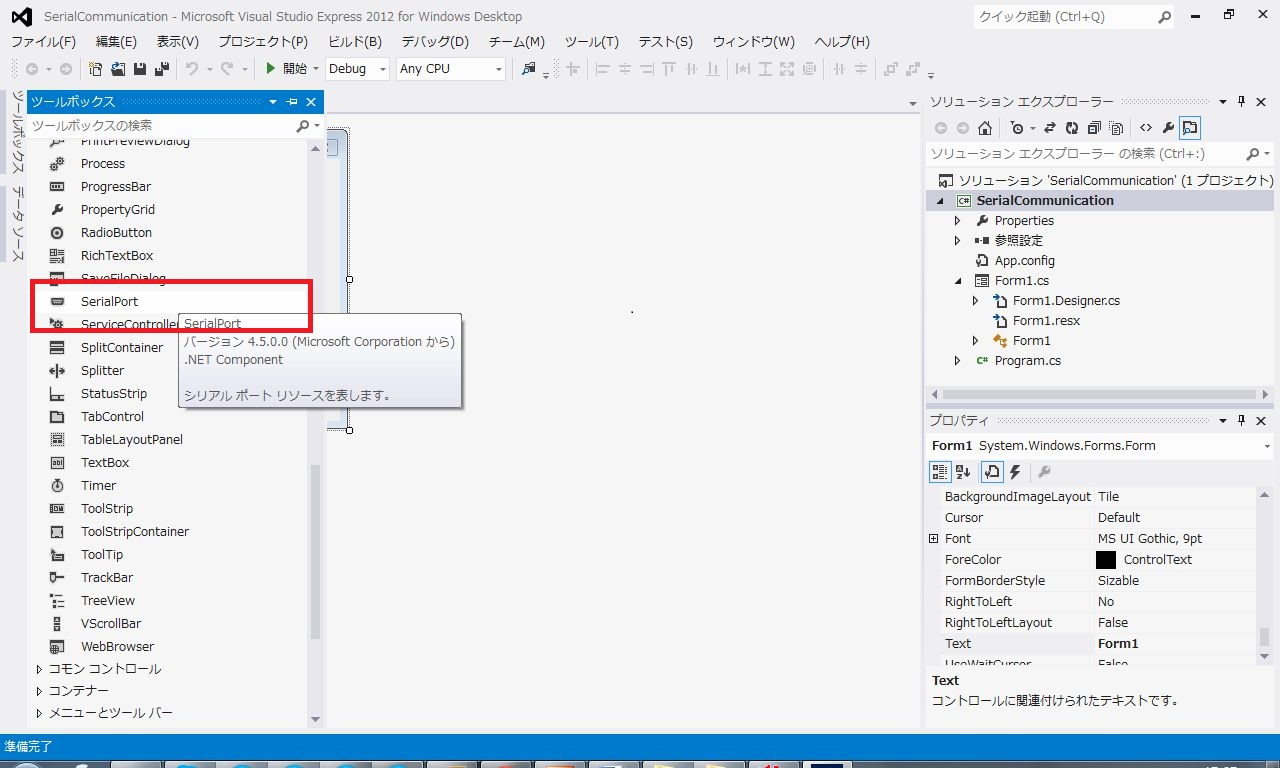
左下のブルーの枠にあるように、シリアルポートが登録されました。
右側の赤枠内のBaudrateを57600に設定してください。(ROBOTISのデフォルトの通信速度です。yukiのは通信設定変えてあるので、通信設定を変えた人はそのBaudrateにしてください。)
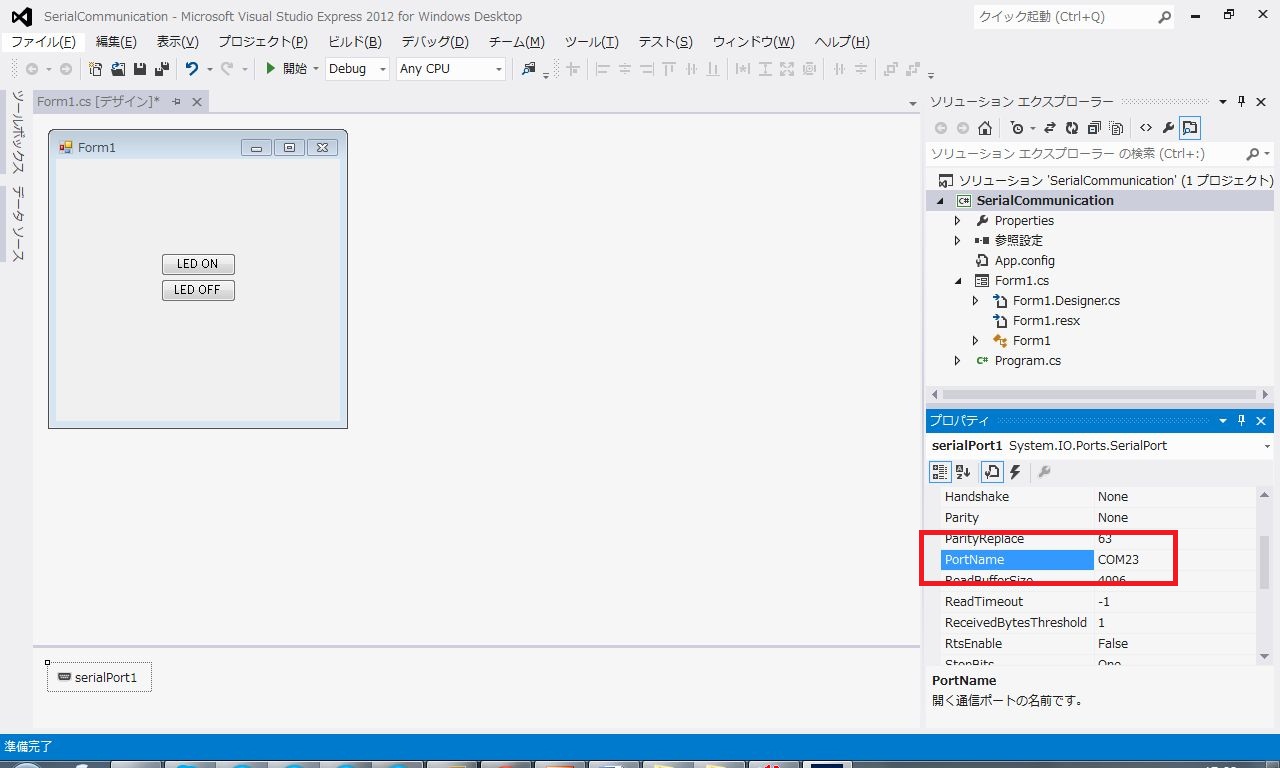
次に、先ほど調べておいたCOMポート番号を設定します。(yukiのはCOM23ですが、自分の番号を入れてください)
次に、シリアルポートを使えるように設定を追加します。
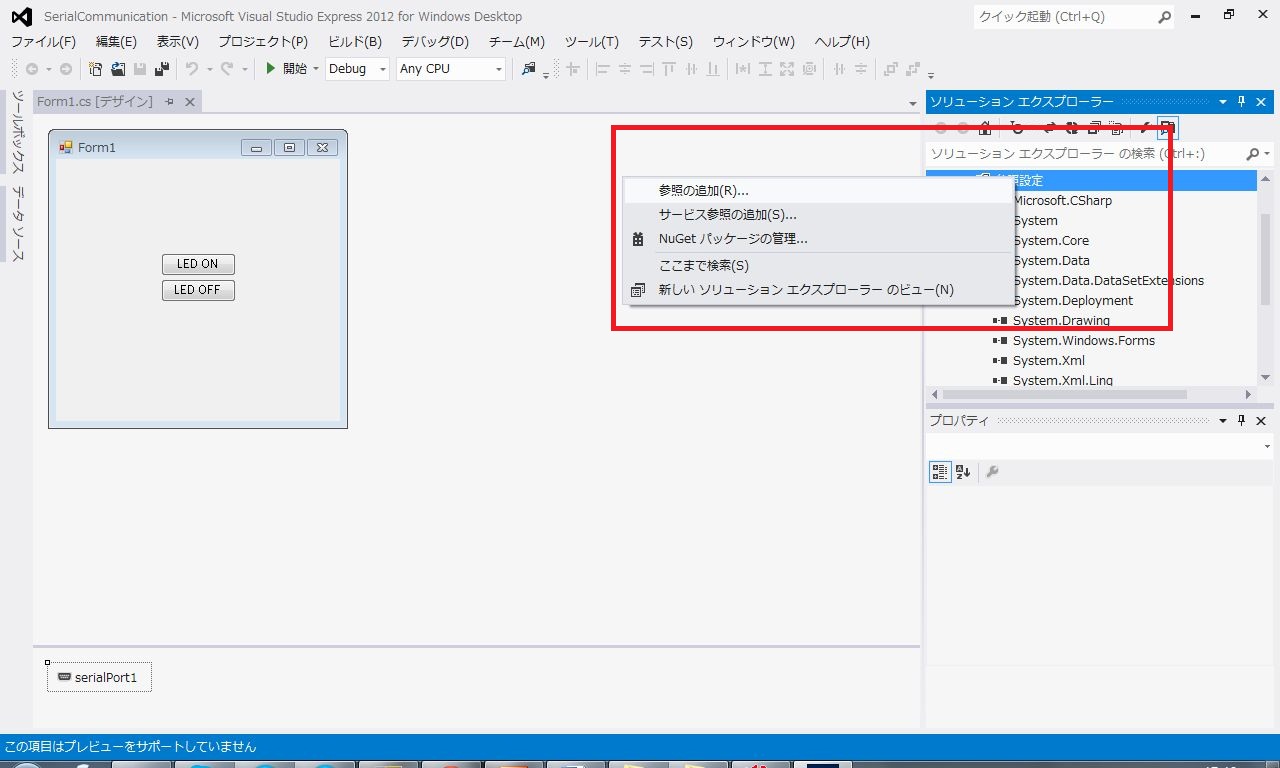
右側の「ソリューションエクスプローラ」の「参照設定」を右クリックし、赤枠のようなメニューを表示します。
ここで、「参照の追加」を選択します。
追加する設定をするウィンドウが開きます。
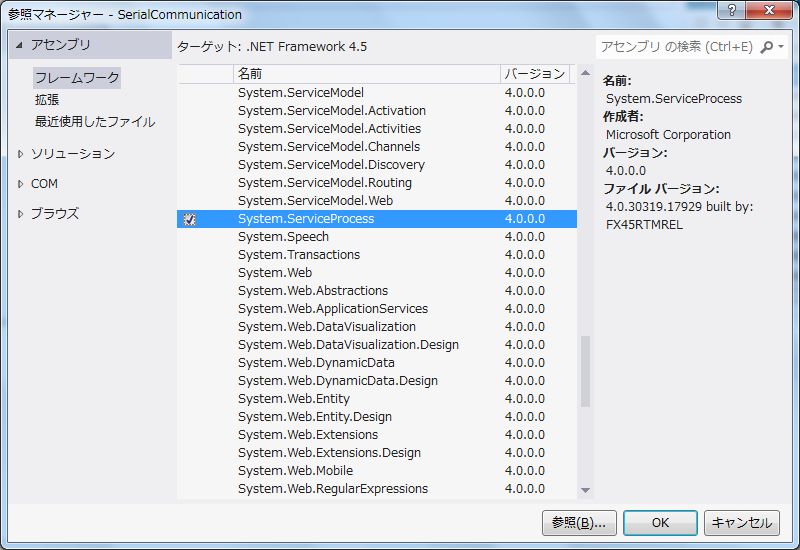
「フレームワーク」にある「System.ServiceProcess」にチェックを入れ、「OK」ボタンを押します。
ここまでできたら、プログラム側で参照できるように設定をさらに行います。
追加できたかどうかはソリューションエクスプローラの赤枠内でみます。
Form1上で、「LED ON」のボタンをダブルクリックします。
そうすると、プログラムを書く画面に切り替わります。
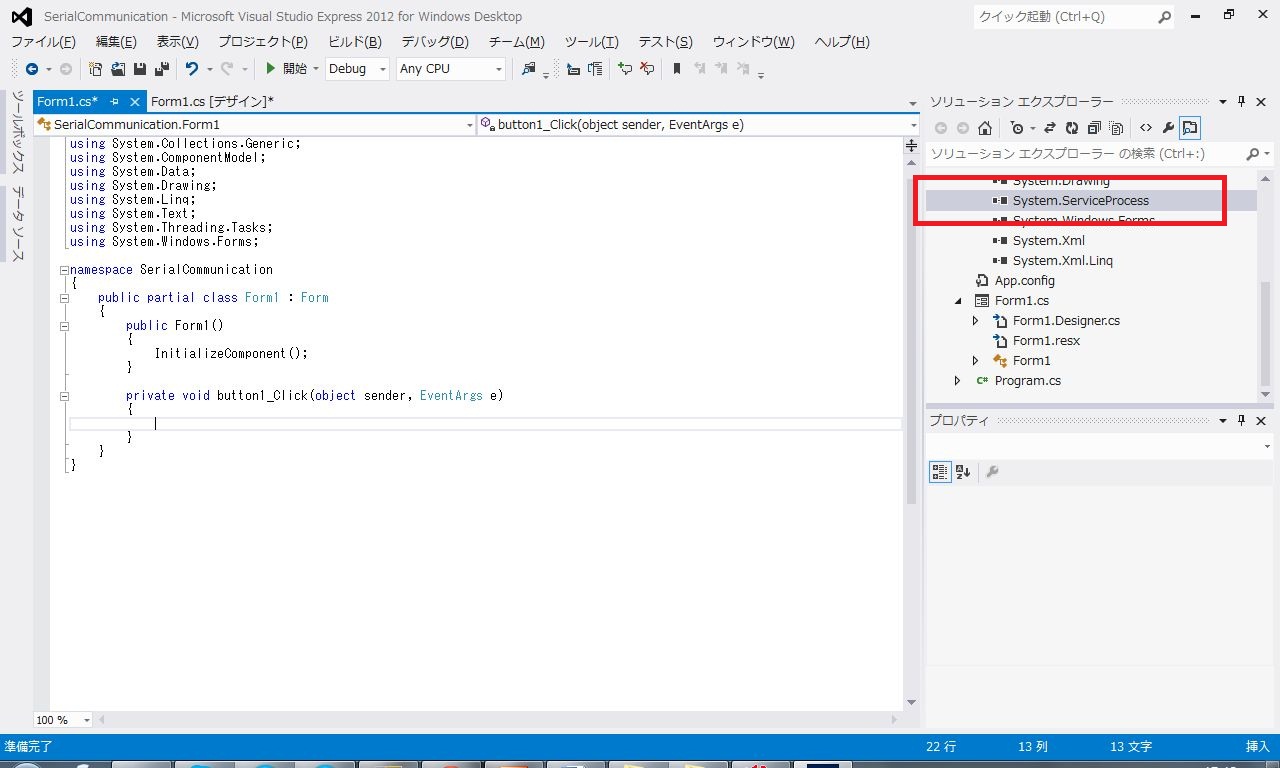
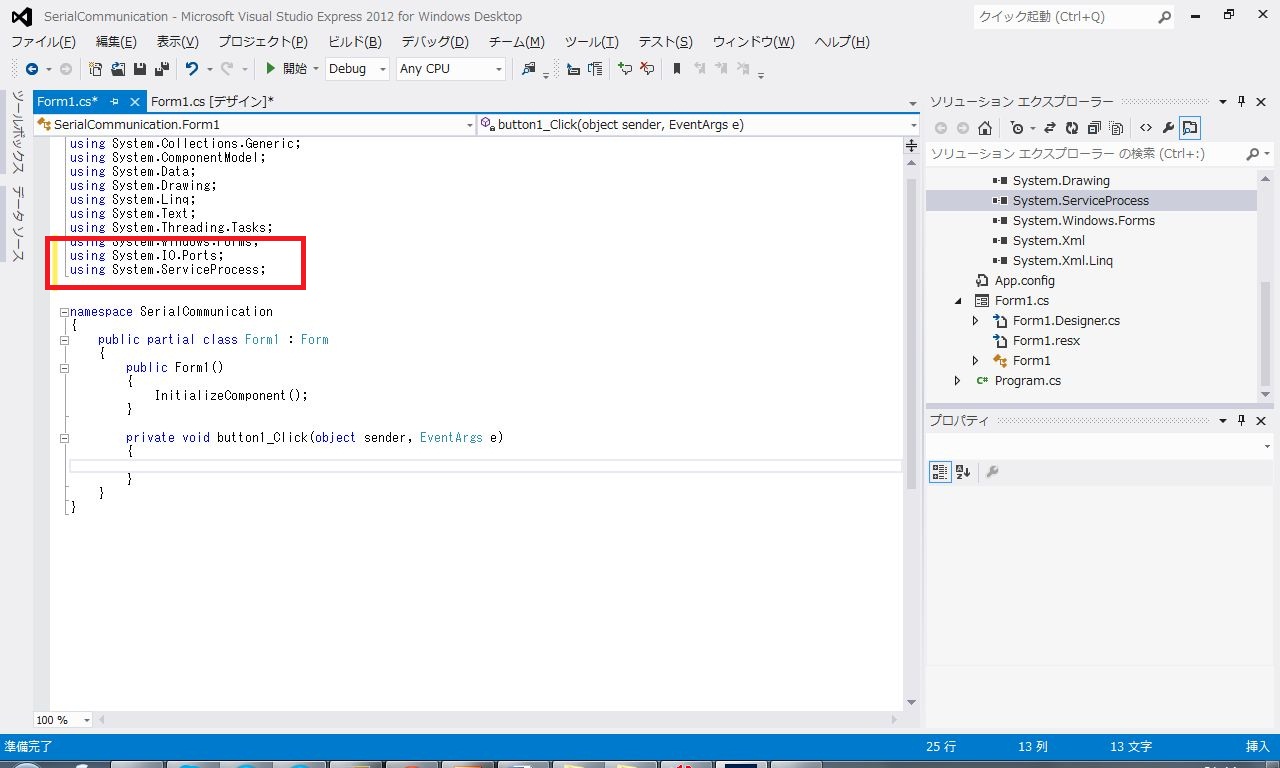
下の画面の赤枠の部分に、
using System.IO.Ports;
using System.ServiceProcess;
を追加します。
System.IO.Portsはシリアルポートを使うための参照設定で、System.ServiceProcessは、データの送受信にかかわる参照設定です。
ここまでできたら、プログラムを追加していきます。
VisualStudioではフォームからイベント関数を自動生成してくれる機能があるので、まずは空の関数を準備します。
すでにButton1の部分はできているので、「Form1.cs[デザイン]」タブをクリックして画面を切り替え、Form1のButton2をダブルクリックして書き込めるように準備します。
これで、Button1とButton2をクリックしたときの動作を書き込むことができます。
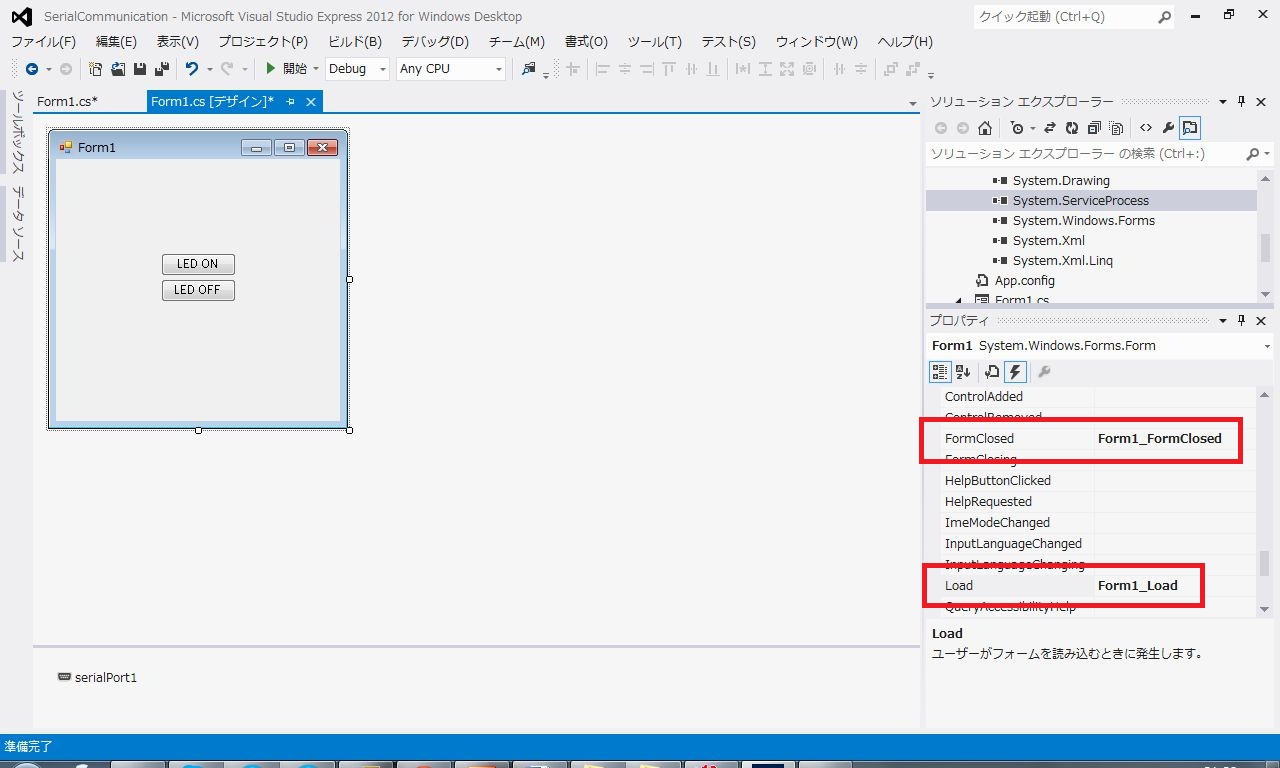
またさらに「Form1.cs[デザイン]」タブをクリックしてデザイン画面に戻り、Form1の上でダブルクリックします。ここでダブルクリックしてできるFormLoadと呼ばれるこのイベントは、Windowsフォームができるときに呼ばれるので、ここには、あとで初期化としてシリアルポートを開く設定を書き込みます。
またさらに「Form1.cs[デザイン]」タブをクリックして戻り、赤枠の上の「FormClosed」イベントをダブルクリックします。このイベントは、Windowsフォームが閉じるとき、つまりプログラムを終えるときに呼ばれるので、ここには、後でシリアルポートを閉じる設定を書き込みます。
またさらに「Form1.cs[デザイン]」タブをクリックして戻ると、下図のようになっているはずです。
確認するイベントは、赤枠の2つです。
これで、シリアルポートのプログラムをする準備ができました。
ここまでの流れや考え方はどんな場合でも一緒です。
この先、プログラムが複雑化したとしても、わからなくなったら基本に立ち返るためのベースにもなりますので、よく覚えておいてください。
では、プログラムを追加してください。
次のソースコードからコピー&ペーストでかまいません。
using System;
using System.Collections.Generic;
using System.ComponentModel;
using System.Data;
using System.Drawing;
using System.Linq;
using System.Text;
using System.Threading.Tasks;
using System.Windows.Forms;
using System.IO.Ports;
using System.ServiceProcess;


namespace SerialCommunication
{
    public partial class Form1 : Form
    {
        public Form1()
        {
            InitializeComponent();
        }

        //ROBOTIS用のチェックサムの計算
        private byte calc_checksum_robotis(byte[] packet)
        {
            int checksum = 0;

            for (int i = 2; i < packet.Length - 1; i++)
            {
                checksum += (int)packet[i];
            }

            checksum = (~checksum) & 0xFF;

            return (byte)(checksum&0xFF);
        }

        private void button1_Click(object sender, EventArgs e)
        {
            byte[] param = new byte[8];
            int size = 0;
            int id = 1;

            //パラメータのセット
            param[size++] = 0xFF;                   //ヘッダー
            param[size++] = 0xFF;                   //ヘッダー
            param[size++] = (byte)(int)(id & 0xFF); //ID
            param[size++] = (byte)4;                //パラメータのバイト数+2
            param[size++] = (byte)3;                //2: READ, 3: WRITE
            param[size++] = 0x19;                   //LED map address
            param[size++] = 1;                      // 1: on 0: off
            param[size++] = calc_checksum_robotis(param);

            //サーボの書き込み
            if (serialPort1.IsOpen == true)
            {
                serialPort1.Write(param, 0, size);
            }
        }

        private void button2_Click(object sender, EventArgs e)
        {
            byte[] param = new byte[8];
            int size = 0;
            int id = 1;

            //パラメータのセット
            param[size++] = 0xFF;                   //ヘッダー
            param[size++] = 0xFF;                   //ヘッダー
            param[size++] = (byte)(int)(id & 0xFF); //ID
            param[size++] = (byte)4;                //パラメータのバイト数+2
            param[size++] = (byte)3;                //2: READ, 3: WRITE
            param[size++] = 0x19;                   //LED map address
            param[size++] = 0;                      // 1: on 0: off
            param[size++] = calc_checksum_robotis(param);

            //サーボの書き込み
            if (serialPort1.IsOpen == true)
            {
                serialPort1.Write(param, 0, size);
            }
        }

        private void Form1_Load(object sender, EventArgs e)
        {
            if (serialPort1.IsOpen == false)
            {
                serialPort1.Open();
            }
        }

        private void Form1_FormClosed(object sender, FormClosedEventArgs e)
        {
            if (serialPort1.IsOpen == true)
            {
                serialPort1.Close();
            }
        }
    }
}
ここで、一つ、 public Form1()の後に、先ほどのイベントにはなかったPrivate関数を追加しました。
        //ROBOTIS用のチェックサムの計算

        private byte calc_checksum_robotis(byte[] packet){

        :

    }
これは、ROBOTISのコマンドのチェックサム計算用です。計算の仕方はこの先の連載で説明しますので、まずは書いてください。
いよいよコンパイルします。
コンパイルが成功すると自動的にデバッグモードでプログラムが起動しますので、あらかじめ、MX-64RはPCに接続状態にしておいてください。
(そうでないとシリアルポートが見つからないとエラーが出ます。)
では、F5キーを押してコンパイルします。
先ほどフォームデザイナで作ったフォームが出てきます。
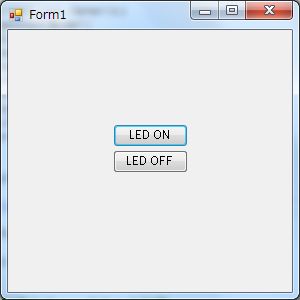
LED ONを押せば、MX-64RのLEDが点灯し、LED OFFを押せばMX-64RのLEDが消灯します。
これで、通信ができていることは確認できましたね。
それではプログラムを見て行きましょう。
ということでまた来週!
今月のロボコンマガジン、SKBの菅ななこちゃんですね。
持っているロボットは、なつかしのKHR-1ですが、本文で紹介されているのはKHR-3HVです。
コメントに「歴女」みたいに「ロボ女」がはやったらいいですね!ってあって、いいこと言うな!って思いました。
ロボコンマガジン、ぜひどうぞ。
【C#の入門書とか】
My motto is “make and do” and “prefer dirty code but good performance if you love beautiful code never perform.”
Let’s make code!
First of all, search COM port number in your PC for MX-64R.
Please connect USB2Serial to your PC which is including starter kit.
Click photo to buy kit
My PC is windows 7. I show you in case of win7.
*Select “Device manager” in control panel to find port.
*click triangle mark in the left of “Port (COM and LPT)” referring to red frame. COM23 is my port number, but your port number is different. Please remember this number. We’ll use it later.
Let’s make C# program.
Please read C# text if you are beginner before challenge of this blog.
I recommend you to learn followings in this series.
*setting of serial ports
*how to handle “byte”
I think it is simple if you learn how to use these things. (My colleague shouts “it is not simple if you learn these…!”)
To confirm communication between PC and MX-64R, first program turns on/off servo LED.
ROBOTIS supports library to drive Dynamixel. We should know basics of serial communication, we don’t use library for this lesson.
First of all, start Visual Studio 2012 C#.
Select “New Project” in red frame in window of VisualStudio2012.
In the window,
- Select Visual C# Visual Basic is selected if you don’t choose here”
- Select “Form application”
- Put program name “SerialCommunication” (you can put favorite name.)
- Click “OK”
This is “Form1” in the window.
Drag and drop “Button” twice from toolbox in the left.
Please change name for Button1.
Change “Button1” in Text to “LED ON” in red frame.
Change “Button2” in Text to “LED OFF” in red frame.
Next step, setting serial port.
From toolbox in red frame(look for below in toolbox), drag and drop “Serialport” to Form1.
You can see serialport in blue frame on the left bottom.
Please change Baudrate to 57600 in ref frame on the right. This is the default baudrate of ROBOTIS servo motor. (If you changed your servo baudrate, please replace here. mine is 1000000.)
Set COM port number which we searched before. (My COM number is 23, you have to put yours)
Next step is adding serial port in program.
Right click on “Solution explorer” in the right, browse menu in red frame.
Select “Add to reference”
(I don’t have English version, pls replace words in your mind if phrase is different.)
Window appears to add settings.
In Framework, put check on “System.ServiceProcess”. Then click OK button.
You can confirm in red frame “System.ServiceProcess” adding in solution explorer.
Let’s move to write program.
Double click on “LED ON” button in Form1.
Display changes to tab to write program.
In the red frame, please add following codes.
using System.IO.Ports;
using System.ServiceProcess;
System.IO.Ports is setting to use serial port. System.ServiceProcess is concerning to tranmit/receive data.
Before adding to program, please do followings.
VisualStudio has function to make css function automatically from form.
We’ve already prepared “Button1” click function. Back to “Form1.cs (Design)” by click to make “button2” function. Double click “LED OFF” button to prepare empty function.
You moved by this operation to program tab to write click event Button1 and Button2.
Back again to “Form1.cs(Design)” tab, double click on Form1 to prepare “load” event empty function. We’ll put initialize of serial port here.
Back again to “Form1.cs(Design)” tab, double click on “FormClosed” event in red frame. This event is called at “close windows form”. We’ll put closing functions in this event.
You can confirm here two events as below.
OK, we finished to prepare empty functions to write program.s
Flow and algorithm are the same in any procedure.
Please remember this basics if you can’t understand what you should do.
Please add sentences according to followings. (You can copy and paste from here)
using System;
using System.Collections.Generic;
using System.ComponentModel;
using System.Data;
using System.Drawing;
using System.Linq;
using System.Text;
using System.Threading.Tasks;
using System.Windows.Forms;
using System.IO.Ports;
using System.ServiceProcess;


namespace SerialCommunication
{
    public partial class Form1 : Form
    {
        public Form1()
        {
            InitializeComponent();
        }

        //ROBOTIS checksum calcuration
        private byte calc_checksum_robotis(byte[] packet)
        {
            int checksum = 0;

            for (int i = 2; i < packet.Length - 1; i++)
            {
                checksum += (int)packet[i];
            }

            checksum = (~checksum) & 0xFF;

            return (byte)(checksum&0xFF);
        }

        private void button1_Click(object sender, EventArgs e)
        {
            byte[] param = new byte[8];
            int size = 0;
            int id = 1;

            //setting parameter
            param[size++] = 0xFF;                   //header
            param[size++] = 0xFF;                   //header
            param[size++] = (byte)(int)(id & 0xFF);    //ID
            param[size++] = (byte)4;                //number of parameter+2
            param[size++] = (byte)3;                //2: READ, 3: WRITE
            param[size++] = 0x19;                   //LED map address
            param[size++] = 1;                      // 1: on 0: off
            param[size++] = calc_checksum_robotis(param);

            //write to servo from serial
            if (serialPort1.IsOpen == true)
            {
                serialPort1.Write(param, 0, size);
            }
        }

        private void button2_Click(object sender, EventArgs e)
        {
            byte[] param = new byte[8];
            int size = 0;
            int id = 1;

            //setting parameter
            param[size++] = 0xFF;                   //header
            param[size++] = 0xFF;                   //header
            param[size++] = (byte)(int)(id & 0xFF);    //ID
            param[size++] = (byte)4;                //number of parameter+2
            param[size++] = (byte)3;                //2: READ, 3: WRITE
            param[size++] = 0x19;                   //LED map address
            param[size++] = 0;                      // 1: on 0: off
            param[size++] = calc_checksum_robotis(param);

            //write to servo from serial
            if (serialPort1.IsOpen == true)
            {
                serialPort1.Write(param, 0, size);
            }
        }

        private void Form1_Load(object sender, EventArgs e)
        {
            if (serialPort1.IsOpen == false)
            {
                serialPort1.Open();
            }
        }

        private void Form1_FormClosed(object sender, FormClosedEventArgs e)
        {
            if (serialPort1.IsOpen == true)
            {
                serialPort1.Close();
            }
        }
    }
}
We added private function which we didn’t prepare from Form1.
        //ROBOTIS checksum calculation

        private byte calc_checksum_robotis(byte[] packet){

        :

    }
This program is for checksum calculation for ROBOTIS servo. I’ll describe how to calculate checksum in the future blog. Please add these sentences.
Finaly, let’s compile!
Our program will start if we are in success compile. Please connect USB2serial and MX-64R to PC.
(If you don’t have cables, it shows error. It is not program error but hardware.)
Push F5 key to compile!
Windows Form application comes which we designed.
click LED ON to turn on MX-64R red LED. Click LED OFF to turn off red LED.
Can you confirm serial communication?
Details of program will unveal in next week.
Can’t wait?
See you next week!